In this article we are going to program the Telebot we have built in the previous article.
We will use WebRTC, which is the new standard for real-time communication in Web browsers, and take advantage of the necessary signaling channel to also transmit commands to move the robot.
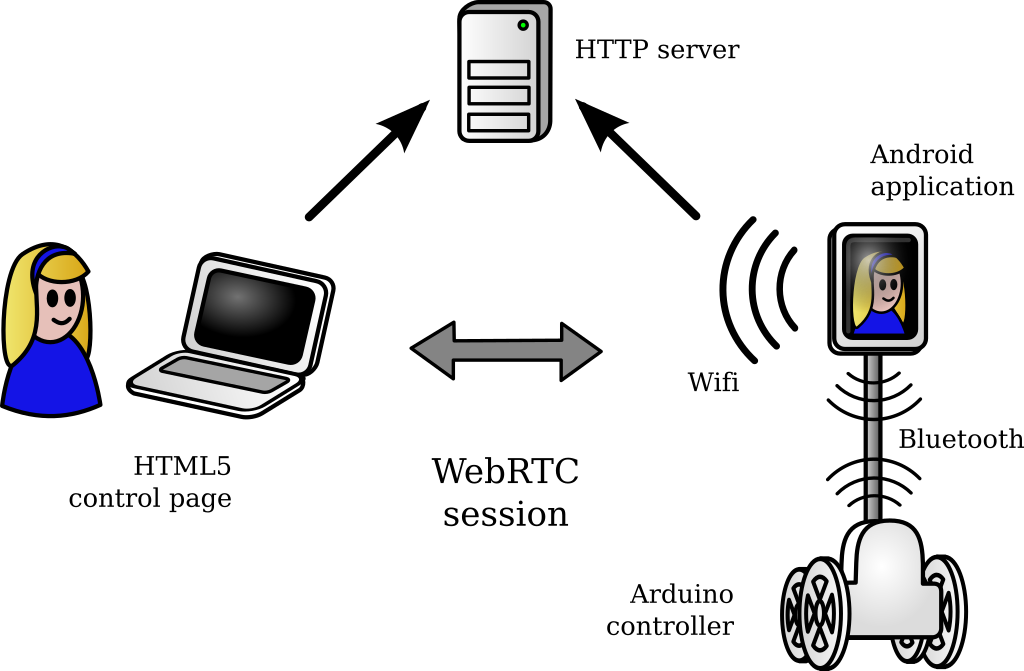
General schematic of the whole control system
Programming the robot actually consists of three different steps:
- Writing Arduino-flavored C++ code for the Arduino-like controller to properly move and balance the robot
- Building a specific Android application to handle a WebRTC session on the smartphone and relay commands to the controller via Bluetooth
- Setting up a node.js server to serve an HTML5 control page over HTTPS allowing visioconference and remote control
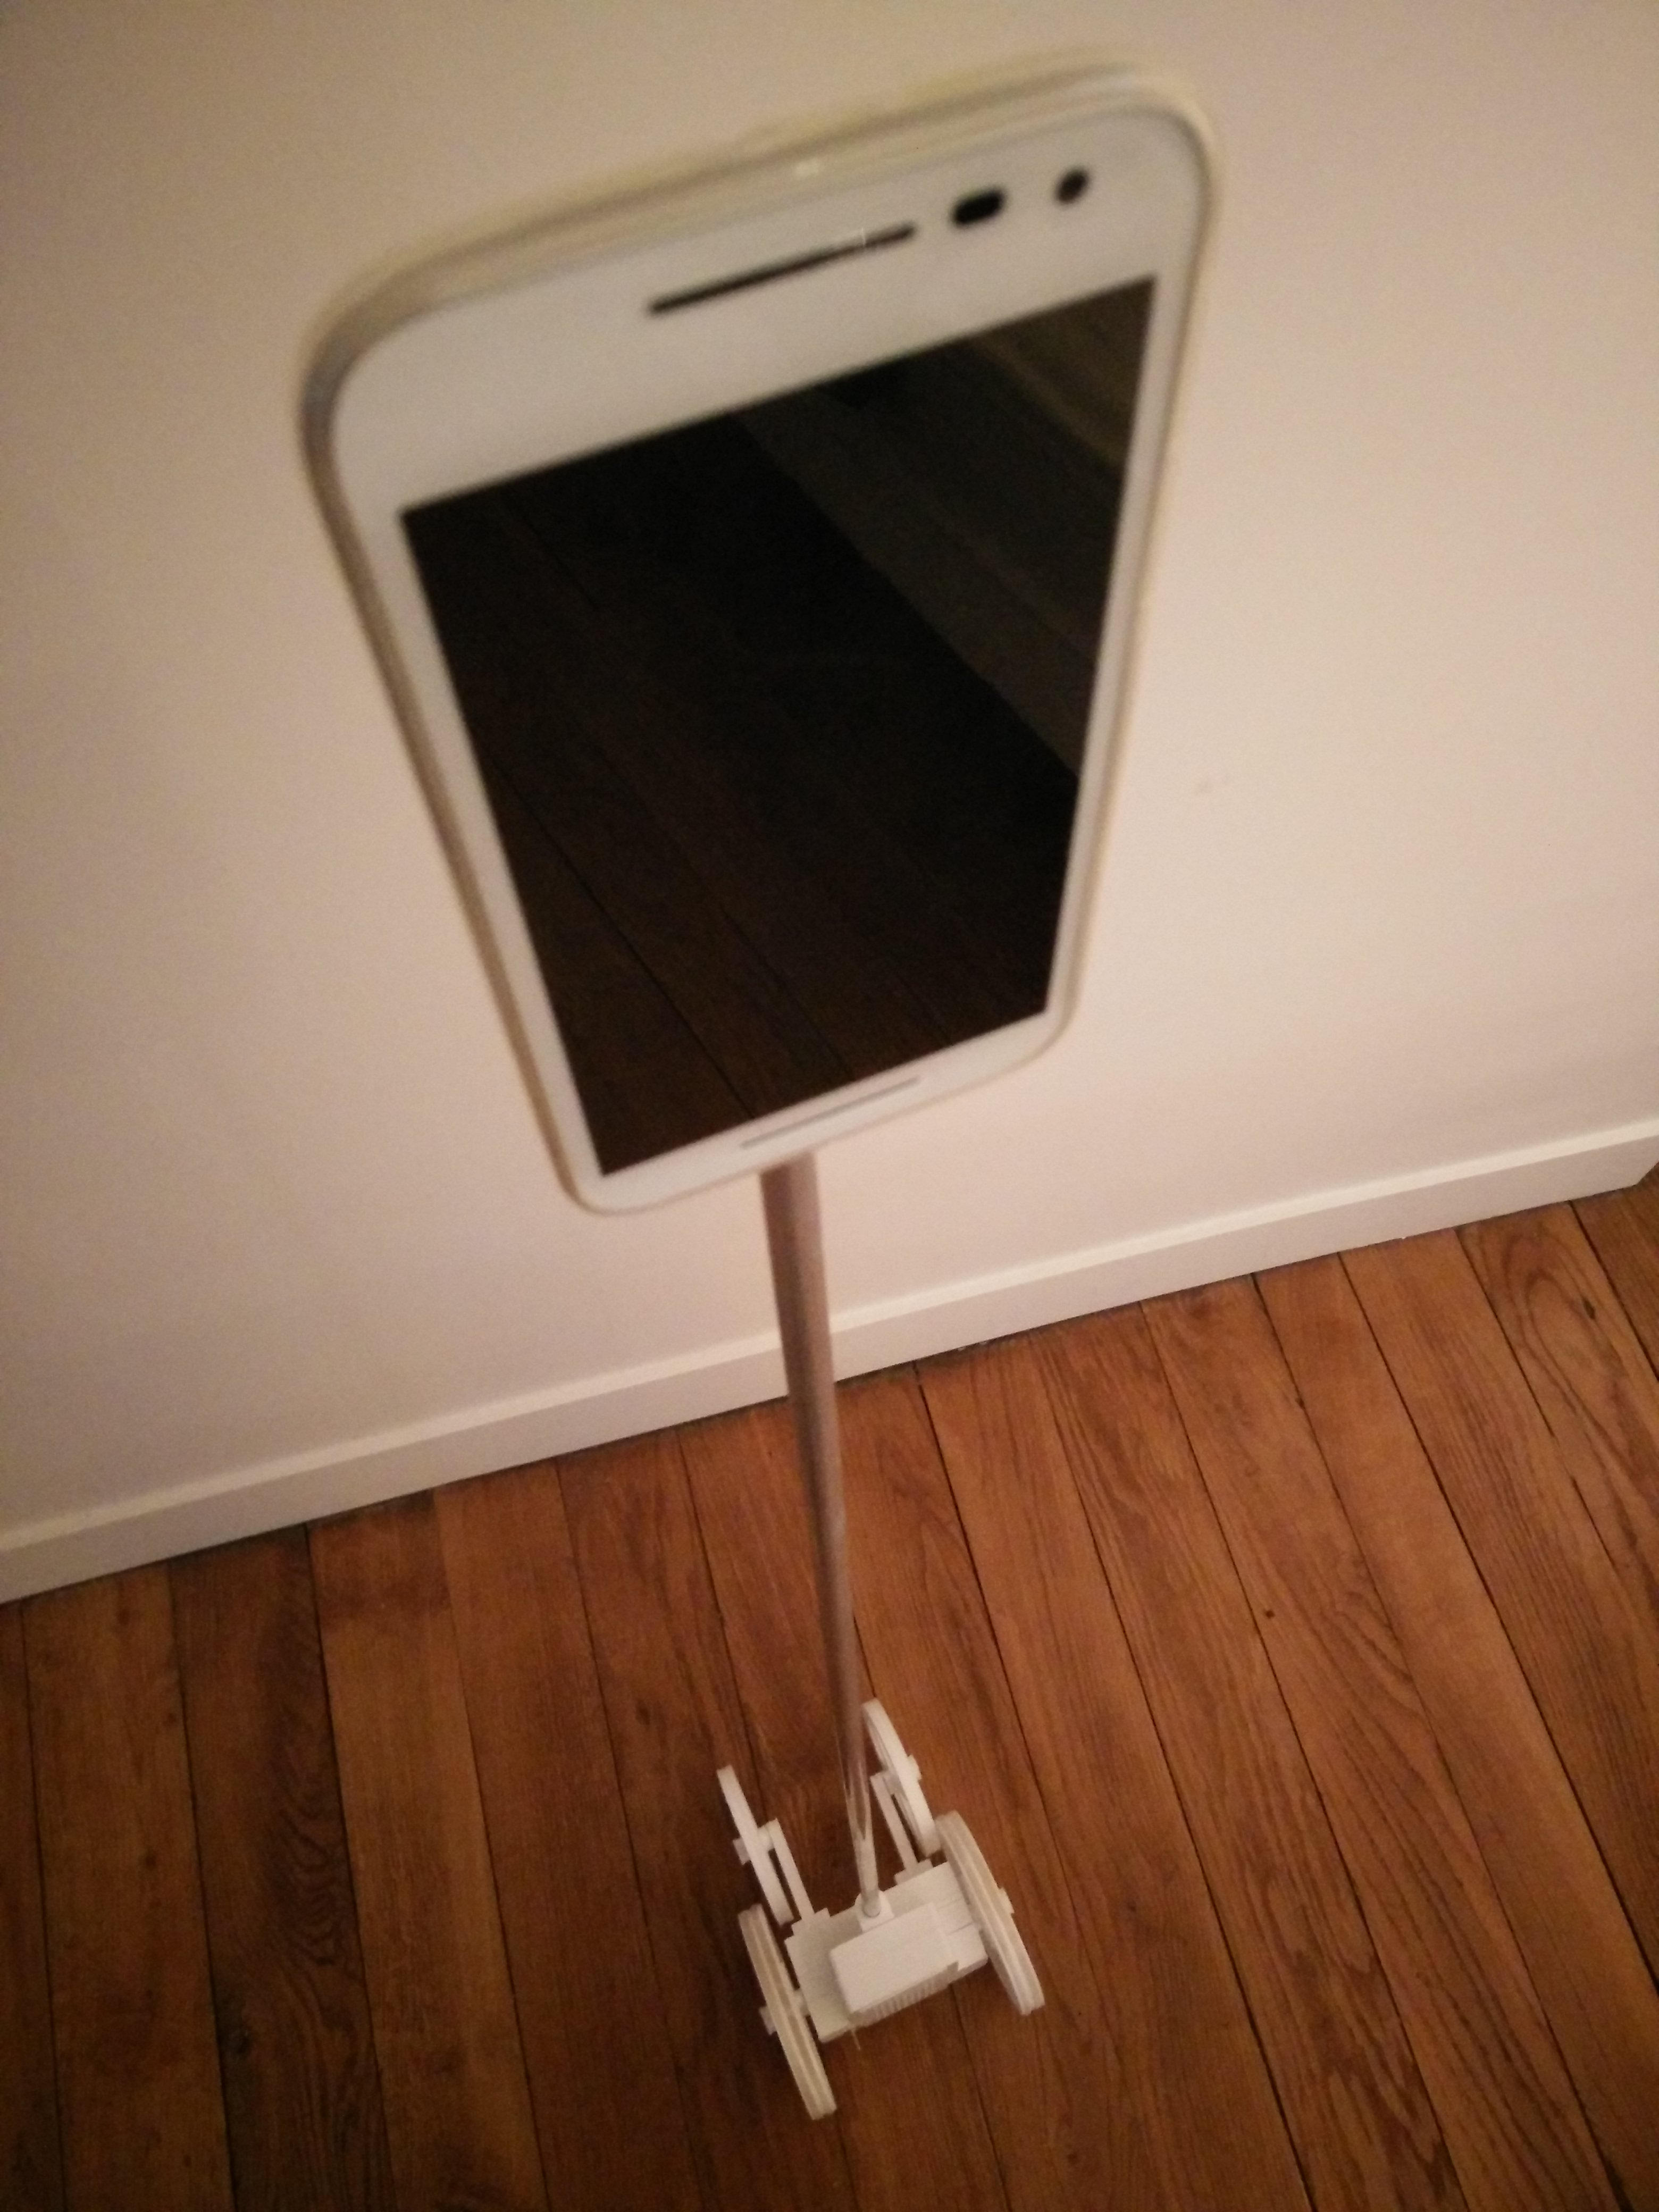
The Telebot ready to be programmed
Therefore, the project will be a mix of Arduino, Android Java, and Javascript (client-side and server-side). The source code is free software, licensed under BSD 2-clause license and GPLv3 (Arduino code). The complete source for the project is available on my repository on GitHub.
Arduino programming
First, motor control is achieved through an extremely simple text protocol over the Bluetooth serial, with one single-letter command and one value per line. Motors are driven with PWM using analogWrite. In parallel, battery voltage is measured thanks to the probe on pin A0, the value is scaled with the empirically-defined factor batteryProbeFactor.
// Pin setup
const int motorLeftBackwardPin  = 2;
const int motorLeftForwardPin   = 3;
const int motorLeftEnablePin    = 5;
const int motorRightBackwardPin = 7;
const int motorRightForwardPin  = 4;
const int motorRightEnablePin   = 6;
const int batteryProbePin       = A0;

SoftwareSerial bluetooth(8, 9); // TX, RX

const long controlFactor = 1000L;   // Adjust depending on motors

const int motorMin = 64;    // Adjust min and max depending on motors
const int motorMax = 255;

String inputString = "";

// Current motor controls
int commandRightPower = 0;
int commandLeftPower  = 0;
int tempRightPower    = 0;
int tempLeftPower     = 0;

// Set right motor power in [-1000, 1000]
void motorRight(int power)
{
    if(abs(power) < 100) power = 0;
    power = constrain(power, -1000, 1000);
    digitalWrite(motorRightBackwardPin, (power < 0 ? HIGH : LOW));
    digitalWrite(motorRightForwardPin,  (power > 0 ? HIGH : LOW));
    if(power != 0) analogWrite(motorRightEnablePin, map(abs(power), 0, 1000, motorMin, motorMax));
    else analogWrite(motorRightEnablePin, 0);
}

// Set left motor power in [-1000, 1000]
void motorLeft(int power)
{
    if(abs(power) < 100) power = 0;
    power = constrain(power, -1000, 1000);
    digitalWrite(motorLeftBackwardPin, (power < 0 ? HIGH : LOW));
    digitalWrite(motorLeftForwardPin,  (power > 0 ? HIGH : LOW));
    if(power != 0) analogWrite(motorLeftEnablePin, map(abs(power), 0, 1000, motorMin, motorMax));
    else analogWrite(motorLeftEnablePin, 0);
}

void setup(void)
{
    // Init pins
    pinMode(motorRightBackwardPin, OUTPUT);
    pinMode(motorRightForwardPin, OUTPUT);
    pinMode(motorRightEnablePin, OUTPUT);
    pinMode(motorLeftBackwardPin, OUTPUT);
    pinMode(motorLeftForwardPin, OUTPUT);
    pinMode(motorLeftEnablePin, OUTPUT);

    // Init serials
    bluetooth.begin(9600);  // HC-06 defaults to 9600bps
    inputString.reserve(100);

    [...]
}

void loop(void)
{
    int batteryVoltage = int(long(analogRead(batteryProbePin))*batteryProbeFactor/1000L);  // mV
    int batteryPercent = constrain(map(batteryVoltage, 3200, 4200, 0, 100), 0, 100);

    // Read commands on bluetooth serial
    while(bluetooth.available())
    {
        char chr = (char)bluetooth.read();
        if(chr != '\n')
        {
            if(chr != '\r')
                inputString+= chr;
        }
        else if(inputString.length() > 0)
        {
            char cmd = inputString[0];
            String param;
            int pos = 1;
            while(pos < inputString.length() && inputString[pos] == ' ') ++pos;
            param = inputString.substring(pos);

            int value = 0;
            switch(cmd)
            {
            case 'L': // left
                value = constrain(param.toInt(), -100, 100)*10;
                tempLeftPower = int(long(value)*controlFactor/1000L);
                break;

            case 'R': // right
                value = constrain(param.toInt(), -100, 100)*10;
                tempRightPower = int(long(value)*controlFactor/1000L);
                break;

            case 'C': // commit
                commandLeftPower  = tempLeftPower;
                commandRightPower = tempRightPower;
                break;
            case 'B': // battery
                bluetooth.print("B ");
                bluetooth.print(batteryPercent);
                bluetooth.println();
                break;
            default:
                bluetooth.println("E");
                break;
            }
            inputString = "";
        }
    }

    [...]
}
If the battery voltage is too low, we trigger an emergency stop to prevent damaging it.
if(batteryPercent == 0)
{
    bluetooth.print("B 0");
    bluetooth.println();
    motorRight(0);
    motorLeft(0);
    exit(0);
}
Before actually setting motor power, we have to add a correction in order to keep the robot balanced: the principle is to move in the direction the robot is leaning, like a Segway. To this end, we need to communicate with the MPU-6050 via the I2C bus to read the measured values. I tried first to use the Arduino Wire library, but it tends to hang after some time and does not seem to allow defining a timeout. It is quite a drawback since it can crash the robot and as a result make it fall down, so I prefer to use a software I2C library.
#define MPU 0x68 // I2C address of the MPU-6050

#define SDA_PORT PORTC
#define SDA_PIN 4       // A4
#define SCL_PORT PORTC
#define SCL_PIN 5       // A5
#define I2C_SLOWMODE 1  // Limit to 25kHz
#define I2C_TIMEOUT 10  // 10ms timeout
#define ADDR(x) (x << 1)
#include <SoftI2CMaster.h> // https://github.com/felias-fogg/SoftI2CMaster

void setup(void)
{
    [...]
    i2c_init();
    i2c_start_wait(ADDR(MPU) | I2C_WRITE);
    i2c_write(0x6B);  // PWR_MGMT_1 register
    i2c_write(0x00);  // set to zero (wakes up the MPU-6050)
    i2c_stop();
}

void loop(void)
{
    [...]
    if(i2c_start(ADDR(MPU) | I2C_WRITE))
    {
        i2c_write(0x3B);  // starting with register 0x3B (ACCEL_XOUT_H)
        i2c_rep_start(ADDR(MPU) | I2C_READ);

        long accx = i2c_read(false)<<8 | i2c_read(false);  // 0x3B (ACCEL_XOUT_H) & 0x3C (ACCEL_XOUT_L)
        long accy = i2c_read(false)<<8 | i2c_read(false);  // 0x3D (ACCEL_YOUT_H) & 0x3E (ACCEL_YOUT_L)
        long accz = i2c_read(false)<<8 | i2c_read(false);  // 0x3F (ACCEL_ZOUT_H) & 0x40 (ACCEL_ZOUT_L)
        long temp = i2c_read(false)<<8 | i2c_read(false);  // 0x41 (TEMP_OUT_H) & 0x42 (TEMP_OUT_L)
        long rotx = i2c_read(false)<<8 | i2c_read(false);  // 0x43 (GYRO_XOUT_H) & 0x44 (GYRO_XOUT_L)
        long roty = i2c_read(false)<<8 | i2c_read(false);  // 0x45 (GYRO_YOUT_H) & 0x46 (GYRO_YOUT_L)
        long rotz = i2c_read(false)<<8 | i2c_read(true);   // 0x47 (GYRO_ZOUT_H) & 0x48 (GYRO_ZOUT_L)

        i2c_stop();

        // Process values here, see the next step
        // Note: temperature in Celsius is temp/340.00+36.53
    }

    [...]
}
Then, to balance the robot, a double linear correction is added to motor control, taking into account the angular speed rotx and the angle angx, with two different empirical constants k1 and k2:
correction = rotx/k1 + angx/k2
Computation should be achieved with integers only, since the processor does not have a native floating point unit. The update loop runs at 100Hz, i.e., values are updated every 10ms.
const long k1 = 1000L;  // Adjust k1 and k2 depending on motors
const long k2 = 400L;

rotx*= 1000;      // all values are in millis
accz*= 1000;

// Calibration
if(millis() <= calibrationMillis)
{
    // Estimate idle input values
    rotx0 = (rotx0*steps + rotx)/(steps+1);
    accz0 = (accz0*steps + accz)/(steps+1);
}
else {
    // Update idle input values
    const long gamma1 = 1000L;
    const long gamma2 = 1000L;
    rotx0 = (rotx0*(gamma1-1) + rotx)/gamma1;
    accz0 = (accz0*(gamma2-1) + accz)/gamma2;

    // Center inputs
    rotx = rotx - rotx0;
    accz = accz - accz0;

    // Smooth
    const long alpha = 10L;
    rotxl = (rotxl*(alpha-1) + rotx)/alpha;
    acczl = (acczl*(alpha-1) + accz)/alpha;

    // Integrate rotation
    angx+= rotx*stepMillis/1000L; // stepMillis = 10

    // Recalibrate angle according to gravity
    const long g = 10L;
    const long beta = 100L;
    angx = (angx*(beta-1) - acczl/g)/beta;

    // Double linear correction with rotation and angle
    long correction = rotxl/k1 + angx/k2;
    correction = constrain(correction, -2000, 2000);

    // Adjust motors
    long motorRightPower = constrain(commandRightPower + (int)correction, -1000, 1000);
    long motorLeftPower  = constrain(commandLeftPower  + (int)correction, -1000, 1000);
    motorRight(motorRightPower);
    motorLeft(motorLeftPower);
}

[...]
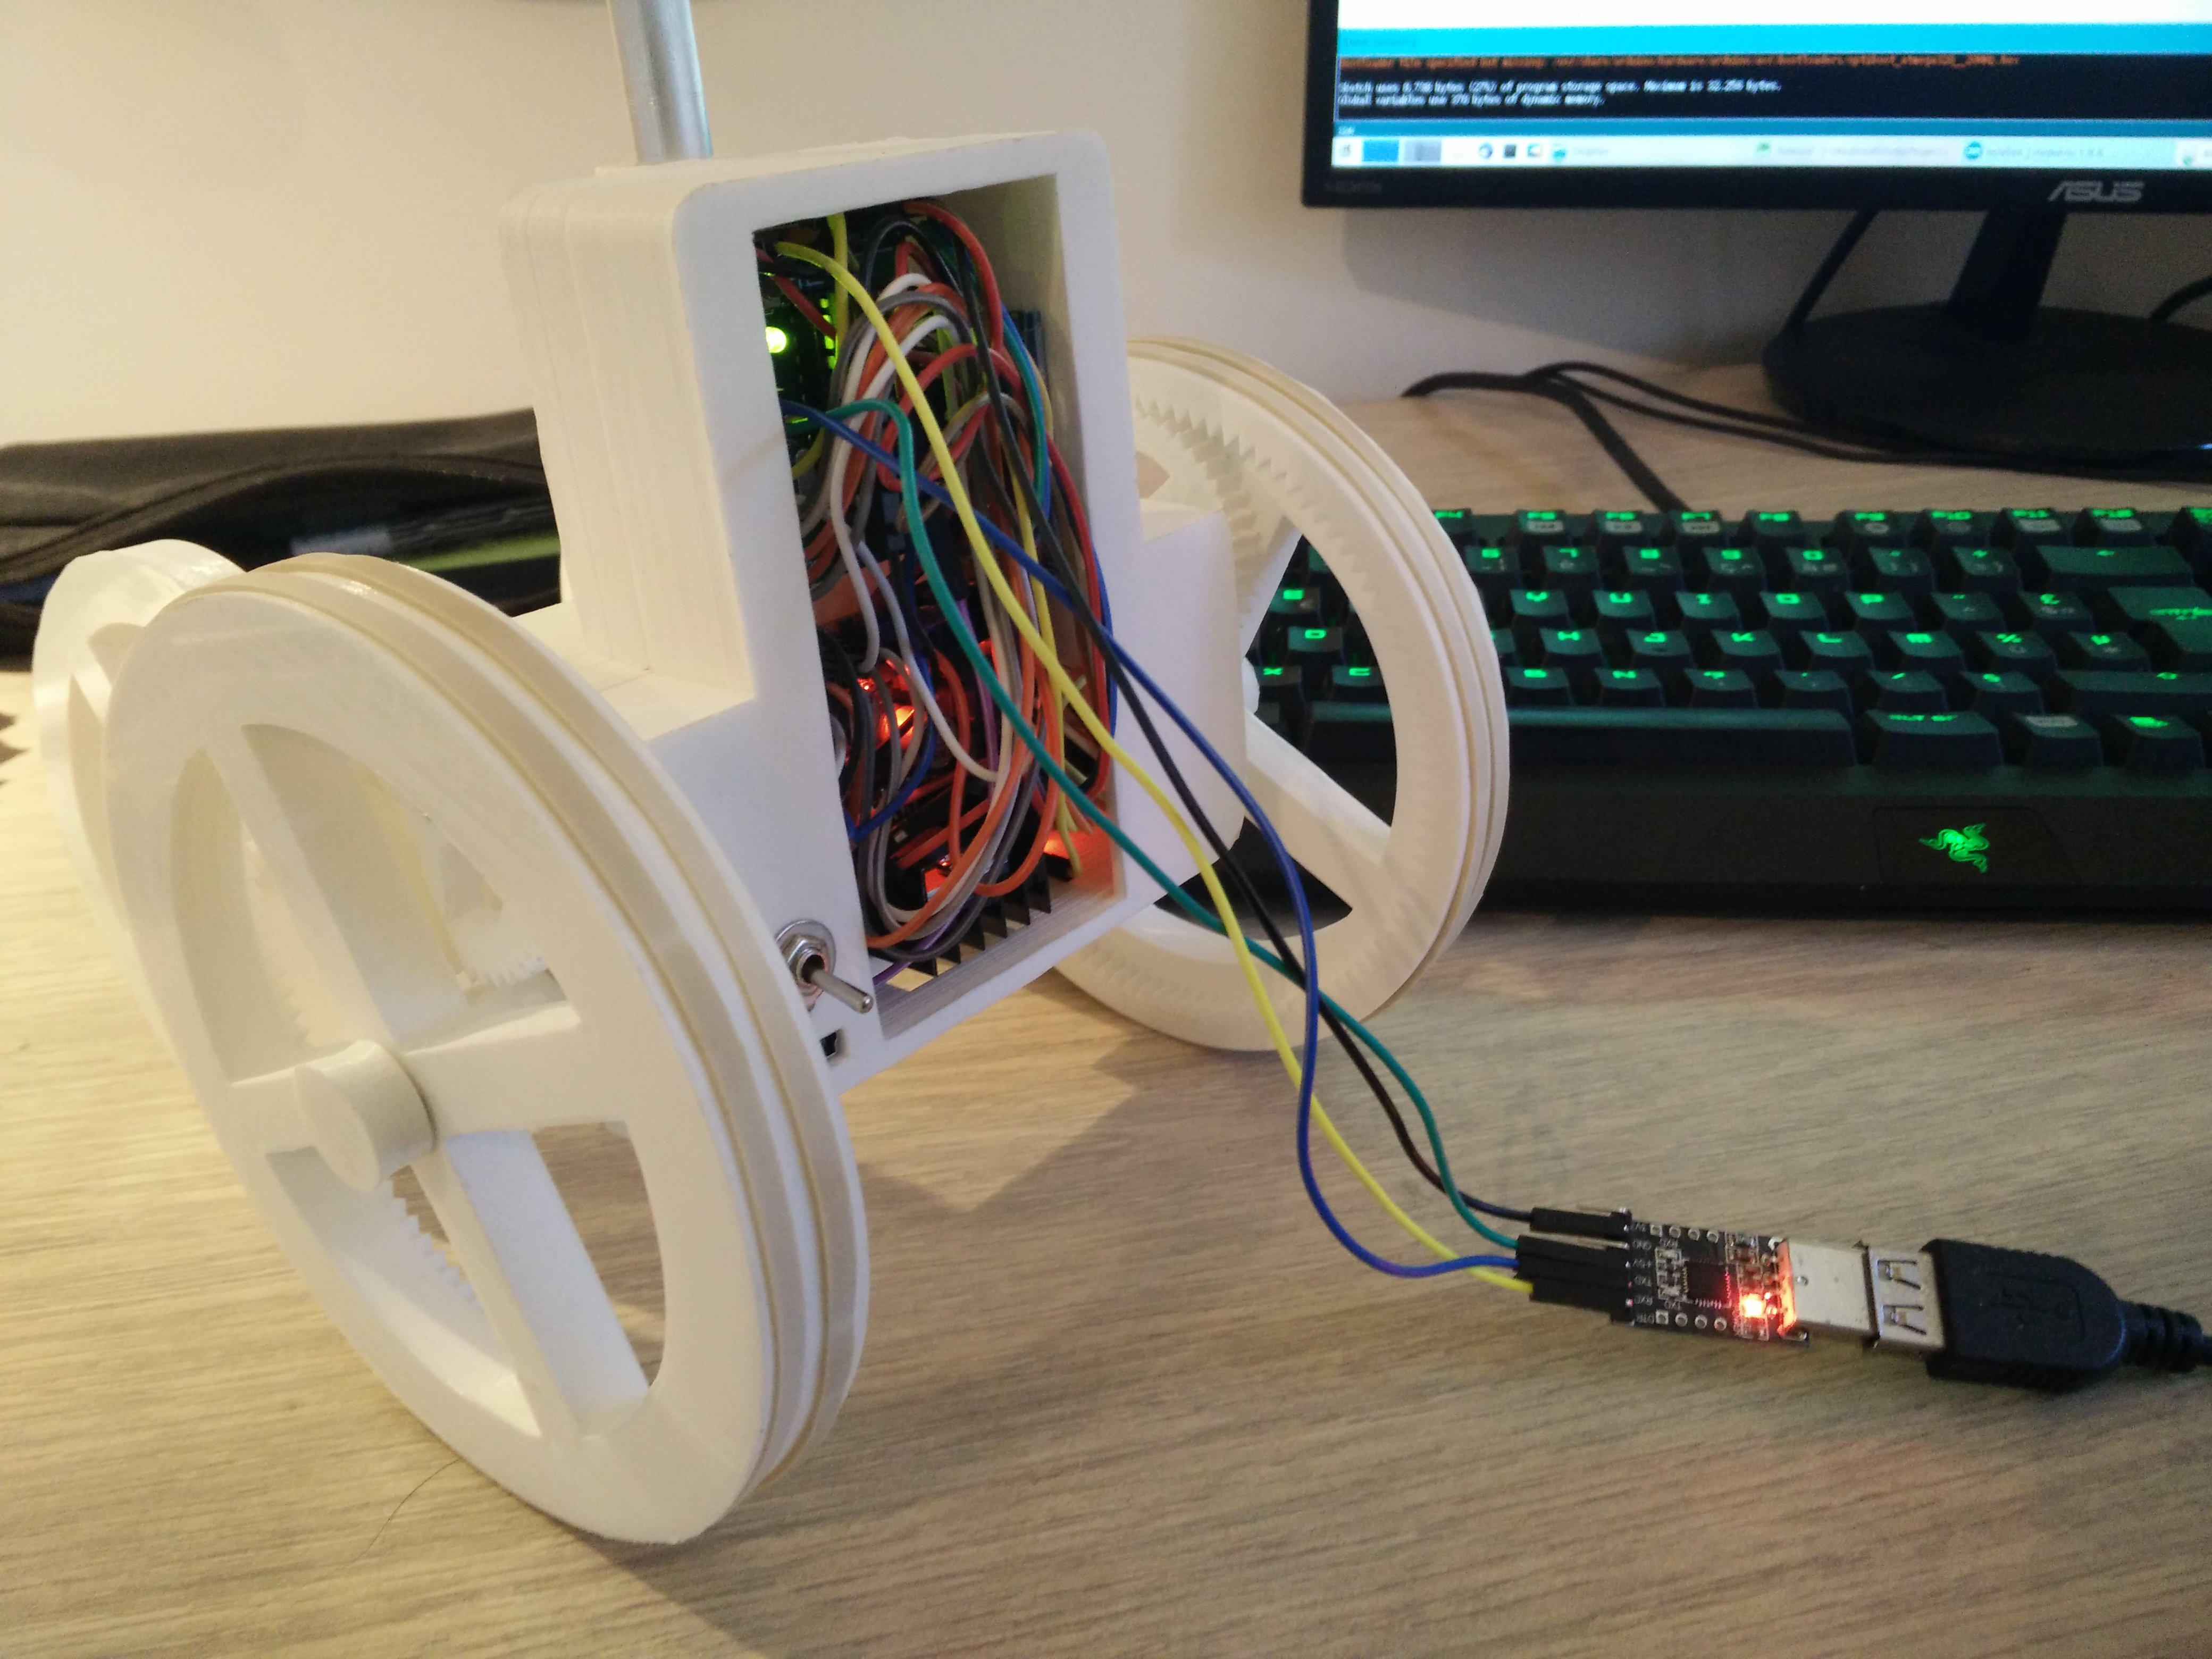
Programming the robot with a USB to UART bridge
Android application
The first job of the Android app is of course to connect to the base via Bluetooth.
We list paired devices called "Telebot", which the HC-06 name has been previously changed to (You only need to connect it directly to the UART and send the AT command "AT+NAMETelebot"). Then we try to connect the serial port service on each of them.
public class TelebotActivity extends Activity {
    // Bluetooth device name
    private static final String DEVICE_NAME = "Telebot";

    // Well-known Serial Port Profile UUID
    private static final UUID SPP_UUID = UUID.fromString("00001101-0000-1000-8000-00805F9B34FB");

    private BluetoothAdapter mBtAdapter;
    private BluetoothSocket mBtSocket;
    private SerialThread mSerialThread;

    @Override
    protected void onStart() {
        super.onStart();

        AsyncTask.execute(new Runnable() {
            @Override
            public void run() {
                if(!initSerial()) {
                    exitWithError("Unable to connect to the Bluetooth device.");
                    return;
                }
                [...]
            }
        });
    }

    // Initialize Bluetooth serial
    private boolean initSerial() {
        // Get the Bluetooth adapter
        mBtAdapter = BluetoothAdapter.getDefaultAdapter();
        if(mBtAdapter == null) return false;

        // Check if Bluetooth is enabled
        if(mBtAdapter.isEnabled()) {
            Log.d(TAG, "Bluetooth is enabled");
        }
        else {
            // Prompt user to turn Bluetooth on
            Intent enableBtIntent = new Intent(BluetoothAdapter.ACTION_REQUEST_ENABLE);
            startActivityForResult(enableBtIntent, 1);
        }

        // Look for Bluetooth device
        Set pairedDevices = mBtAdapter.getBondedDevices();
        for(BluetoothDevice device : pairedDevices) {
            if(device.getName().equals(DEVICE_NAME)) {
                try {
                    Log.d(TAG, "Found Bluetooth device ");

                    // Connect serial port on device
                    mBtSocket = device.createInsecureRfcommSocketToServiceRecord(SPP_UUID);
                    mBtSocket.connect();
                    Log.d(TAG, "Bluetooth device connected");

                    // Create thread
                    mSerialThread = new SerialThread(mBtSocket);
                    mSerialThread.start();
                    break;
                }
                catch (IOException e) {
                    e.printStackTrace();
                }
            }
        }

        return (mSerialThread != null);
    }

    // Thread handling the BluetoothSocket
    private class SerialThread extends Thread {
        private InputStream mInStream;
        private OutputStream mOutStream;

        public SerialThread(BluetoothSocket socket) throws IOException {
            mInStream = socket.getInputStream();
            mOutStream = socket.getOutputStream();
        }

        public void run() {
            if(mInStream == null) return;
            try {
                // Read lines from Bluetooth serial
                int chr;
                StringBuffer line = new StringBuffer();
                while((chr = mInStream.read()) >= 0) {
                    if(chr == '\n') {
                        Log.d(TAG, "Received: " + line);
                        line.setLength(0);
                    }
                    else {
                        if(chr != '\r')
                        line.append((char)chr);
                    }
                }
            } catch (IOException e) {
                e.printStackTrace();
            }
        }

        // Write line on Bluetooth serial
        public void writeln(String line) {
            try {
                if(mOutStream != null) mOutStream.write((line + '\n').getBytes());
                Thread.sleep(10);
            } catch (IOException e) {
                Log.d(TAG, "Sending failed: " + e.getMessage());
            } catch (InterruptedException e) {
                e.printStackTrace();
            }
        }
    }
}
I have attempted for some time to make use of OpenWebRTC to create a WebRTC-enabled native Android application, but I could not obtain something reliably interoperable with Firefox or Chromium, even after some debugging. For this reason, I'm creating an Android application handling the robot controls but relying on a Chrome instance to handle the actual WebRTC session. It is kind of a hack, but it works.
@Override
protected void onStart() {
    super.onStart();

    AsyncTask.execute(new Runnable() {
    @Override
    public void run() {
            // Initialize serial
            if(!initSerial()) {
                [...]
            }

            // Join session
            join(mSessionId, mUserId);

            // Finally, start the browser to actually handle WebRTC
            Intent i = new Intent(Intent.ACTION_VIEW);
            i.setData(Uri.parse(URL + "/#_" + mSessionId));
            i.setPackage("com.android.chrome");
            startActivityForResult(i, 2);
        }
    });
}

@Override
protected void onActivityResult(int requestCode, int resultCode, Intent data) {
    super.onActivityResult(requestCode, resultCode, data);
    if(requestCode == 2) {
        // If the browser session ends, close the app
        finish();
    }
}
For the signaling channel, I simply use a modified version of OpenWebRTC simple signaling channel for Android. It is lightweight and fulfills the purpose entierly, so why recode my own thing?
In the app, the signaling channel is obvisously not used for WebRTC, since it will be handled in a separate browser, but it is of the utmost importance because it receives user commands to move the robot.
EDIT: I changed this behaviour in new versions. Now, user commands use an RTCDataChannel rather than the signaling channel, allowing to reduce latency.
@Override
public synchronized void onMessage(final JSONObject json) {
    if(json.has("control")) {
        try {
            JSONObject control = json.optJSONObject("control");
            int left = control.getInt("left");
            int right = control.getInt("right");
            setControl(left, right);
        }
        catch (JSONException e) {
            e.printStackTrace();
        }
    }
}

// Send motor control command, values are in percent
private void setControl(int left, int right) {
    if(mSerialThread != null) {
        mSerialThread.writeln("L " + left);  // left
        mSerialThread.writeln("R " + right); // right
        mSerialThread.writeln("C");          // commit
    }
}
Javascript frontend and backend
Since the robot uses a browser to handle the WebRTC session, the Javascript client must handle active mode (for the user) and passive mode (for the robot).
// Check WebRTC is available
if(!navigator.mediaDevices.getUserMedia) {
    displayMessage("Browser not compatible");
    return;
}

// Get a local stream
var constraints = { audio: true, video: true };
navigator.mediaDevices.getUserMedia(constraints)
    .then(function(stream) {
        localStream = stream;

        // Set self view
        selfView.srcObject = stream;
        selfView.style.visibility = "visible";
        selfView.onloadedmetadata = function(evt) {
            selfView.play();
        };

        if(active) {
            // If active, call button triggers peerJoin()
            callButton.onclick = function() {
                callButton.disabled = true;
                peerJoin();
            };
        }
        else {
            // If not active, call peerJoin() directly
            peerJoin();
        }
    })
    .catch(function(err) {
        logError(err);
        displayMessage("Media device not available");
    });
For its signaling channel, the Javascript client also use a modified version of OpenWebRTC simple signaling channel. Either the arrows on the page or the keyboard can be used for user input, and controls are sent over the channel just like WebRTC signaling. Please check the repository for the complete source code.
// Send new controls to peer
function updateControl() {
    if(controlContainer.style.display == "none")
        return;

    var left  = 0;
    var right = 0;
    if(controlUp) {
        left += 1;
        right+= 1;
    }
    if(controlDown) {
        left += -0.70;
        right+= -0.70;
    }
    if(controlLeft) {
        left = Math.min(left  - 0.50, 0);
        right= Math.max(right + 0.30, 0);
    }
    if(controlRight) {
        left = Math.max(left  + 0.30, 0);
        right= Math.min(right - 0.50, 0);
    }

    var power = 100;
    left  = Math.round(Math.min(Math.max(left,  -1), 1)*power);
    right = Math.round(Math.min(Math.max(right, -1), 1)*power);

    if(peer) {
        peer.send(JSON.stringify({
            "control": {
                "left": left,
                "right": right
            }
        }));
    }
}
The node.js server is a slightly modified version of OpenWebRTC example server. It is deployed behind an Apache server with HTTPS configured with Let's Encrypt.
I also installed coturn STUN/TURN server to help WebRTC session establishment when NAT is in use, i.e. in most of the use cases. I can't wait for ubiquitous IPv6 network access to bring the death of NAT.
Thanks to the HTML5 interface, you can use the Telebot from any device with a recent browser equipped for video and sound capture, even another smartphone. However, it won't work out of the box on an iPhone, since iOS does not have any major browser available with WebRTC support as of today, even through this standard feature has been available on other platforms for years...
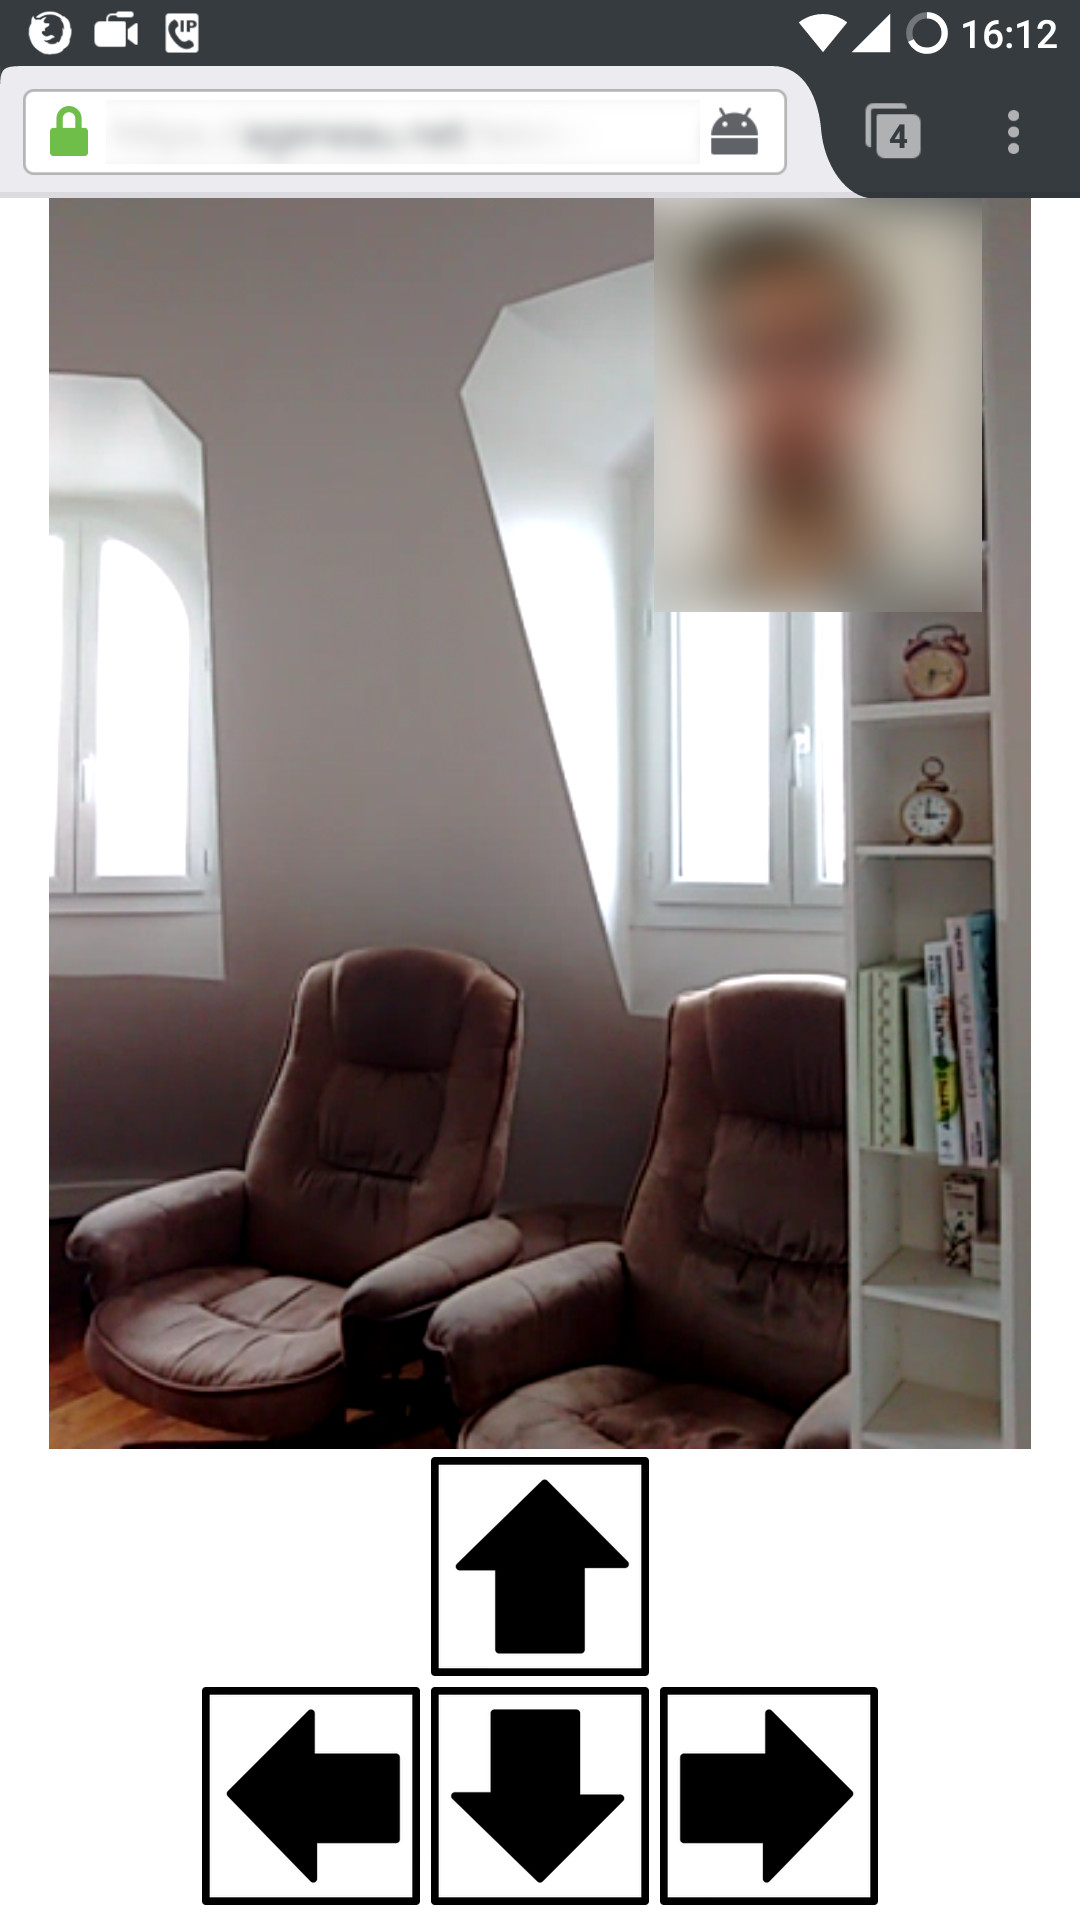
The interface in Firefox for Android
Eventually, it works wonderfully! I have only added a microphone to the smartphone to enhance sound capture.
They see me rollin’, they hatin’
EDIT: You can read about subsequent enhancements here, in particular the use of an RTCDataChannel for controls.

